
What is MySQL replication?
MySQL replication is the process of creating replica of our existing server i.e data from one server is automatically replicated onto another server in real-time. Replication helps to increase system resiliency (eliminating a single point of failure) and scalability (by providing more nodes that can execute queries).
Common replication topologies are Master-Master or Master-Slave. In Master-Slave, all writes are performed to the master and get replicated to the slave. In Master-Master systems, reads and writes can be performed against both nodes in the topology.
prerequisites
For this master-slave replication setup , you require two RHEL 8 servers.
Let’ get started.
STEP1 : Install MySQL on both the server.
you can install it by using following yum command.
# yum install @mysql -y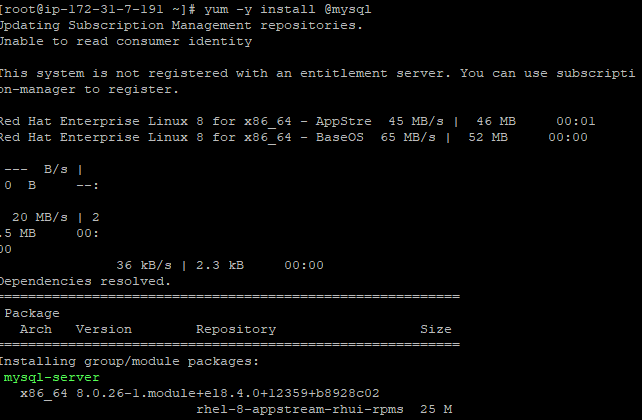
So, we have successfully installed MySQL on both the servers, now start the MySQL service and make it start automatically each time you start the server with systemctl utility.
# systemctl enable mysqld
# systemctl start mysqld
STEP2 : Secure MySQL.
For fresh installations of MySQL, you’ll want to run the DBMS’s included security script. This script changes some of the less secure default options for things like remote root logins and sample users.
# mysql_secure_installationThis will take you through a series of prompts where you can make some changes to your MySQL installation’s security options. you can press Y and then ENTER to accept the defaults for all the subsequent questions.
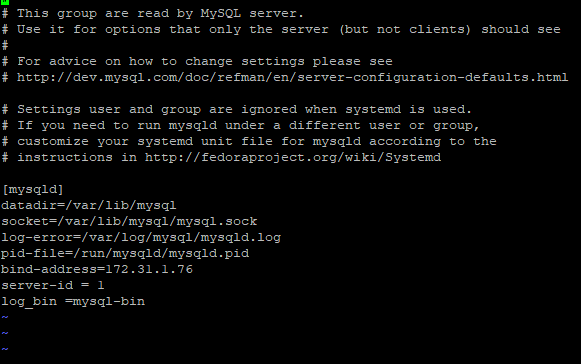
STEP 3: Configuring MySQL on Master node.
In order for your master MySQL database to begin replicating data, you need to make a few changes to its configuration.
# vi /etc/my.cnf.d/mysql-server.cnf
Add the following lines in mysqld section.
bind-address =<master-ip-address>
server-id = 2
log_bin =mysql-bin
Then restart the MySQL service by running the following command:
# sudo systemctl restart mysqldStep 3 : Creating a Replication User.
Log in to your MySQL master server as the root user and provide the password.
# mysql -u root -pNow ,to create a user run the following command.
mysql> CREATE USER '<user-name>'@'<slave-server-ip>' IDENTIFIED BY '<password>';Be sure to put your slave server ip-address to your <slave-server-ip> and to change <password> to a strong password of your choosing.
After creating the new user, grant them the appropriate privileges.
mysql> GRANT REPLICATION SLAVE ON *.*TO '<user-name'@'<slave-server-ip>';Step 4 : Retrieving Binary Log Coordinates from the Master.
Now, run the following command that will print the information for master’s binary log files:
mysql> SHOW MASTER STATUS\G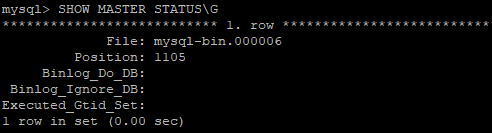
Remember to take note of the resulting filename and its position .
Step 4: Configuring the MySQL Slave Server.
To configure Slave server, open configuration file of slave server.
# vi /etc/my.cnf.d/mysql-server.cnfAdd the following lines in mysqld section.
bind-address =<slave-ip-address>
server-id = 2
log_bin =mysql-bin
Restart the server.
# sudo systemctl restart mysqldNow the next step is to configure the slave server to replicate from the Master server. Log in to MySQL server.
Log in to your MySQL slave server as the root user.
# mysql -u root -pFirst, stop the replication threads.
mysql> STOP SLAVE;
Run the following query that will configure the slave to replicate from the Master server.
mysql> CHANGE MASTER TO
    -> MASTER_HOST='<enter ip>' ,
    -> MASTER_USER='<enter username>' ,
    -> MASTER_PASSWORD='<password>' ,
    -> MASTER_LOG_FILE='mysql-bin.000002' ,
    -> MASTER_LOG_POS=939;
Finally, activate the slave server.
mysql> START SLAVE;
Step5 : Testing Replication.
Log in to master’s MySQL datbase server.
# sudo mysql -u root -pCreate a database for testing.
mysql> CREATE DATABASE test_database;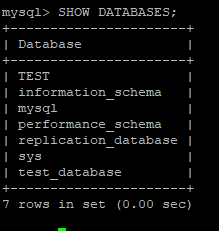
Now , on slave server again log in to the MySQL database server.
# sudo mysql -u root -pIf replication is working correctly, you’ll see the test_database you just added to the master.
mysql> SHOW DATABASES;
As you can see , test_databse which we have created on master got replicated to slave automatically, this means MySQL replication setup works.