

What is NFS?
NFS originally stood for the Network File System and was invented by Sun Microsystems (now a part of Oracle). NFS means both the set of network protocols that allow someone to access files over the network and the software that is written to use those protocols. The computer accessing the files is a client. The computer delivering the files is the server.
Let’s get started.
STEP 1: INSTALL NFS-KERNEL-SERVER.
# apt-get install nfs-kernel-server -yOnce the installation is complete, start the NFS service and enable it to start at system reboot by running the following commands:
# systemctl start nfs-server
# systemctl enable nfs-server
STEP 2: CREATE A SHARED DIRECTORY ON NFS SERVER.
Create a directory that will be shared among client systems, which is also known as an export directory.
# mkdir nfs_shareNext, assign proper ownership and permissions to the /nfs_share directory so it can be accessible from the client machines.
# chown nobody:nogroup /nfs_share
# chmod -R 777 /nfs_share
STEP 3: Configure NFS exports to grant NFS share access to client systems.
Edit the file /etc/exports with vi/nano editor:
# vi /etc/exports Add the following line to it.
/nfs_share <client-ip-address>(rw,sync,no_subtree_check)In place of <client-ip-address> , enter your client’s ip address.
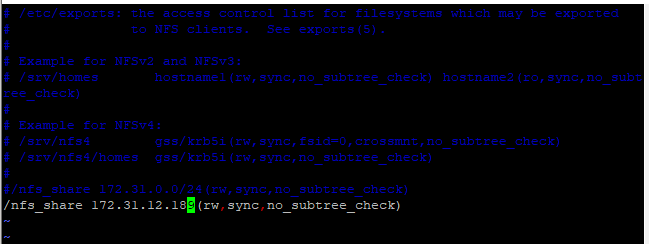
- rw: Stands for Read/Write.
- sync: Requires changes to be written to the disk before they are applied.
- No_subtree_check: Eliminates subtree checking.
To export the shared directory and make it available to all client systems run the folllowing command:
# export -aRestart the NFS kernel server for the changes to come into effect.
# systemctl restart nfs-serverSTEP 4: Allow NFS access through the firewall.
# ufw allow from <client-ip-address> to any port nfsNow reload the UFW firewall to apply the changes.
# ufw reloadSTEP 5: Install the NFS client on the client systems.
# apt-get install nfs-common -ySTEP 6: Create a mount point /client_share under /opt directory on which you will mount the nfs share from the NFS server.
# mkdir /opt/client_shareStep 7: Mount NFS share on the client system by running the following command:
# mount <server-ip-address>:nfs_share /opt/client_share Put your server IP-address in place of <server-ip-address>.
verify that the NFS share directory is mounted using the following command:
# df -h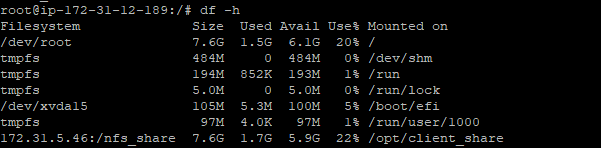
To make the mounts permanent on reboot, open the /etc/fstab file:
# vi /etc/fstabAdd the following line to the file.
<server-ip>:/nfs_share /opt/client_share nfs defaults,timeo=900,retrans=5,_netdev 0 0
Save and close the file then run the following command to apply the changes:
# mount -aSTEP 8: Testing the NFS share on the client system.
let’s create some files and directories on the NFS server.
# cd nfs_share
# mkdir dir1 dir2
# touch file1 file2
Now, go back to your client system and verify all files and directories in your mounted directory:
# ls -l /opt/client_share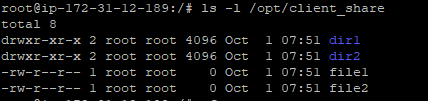
As you can see, we can access the files we just created on the NFS server.
Thanks for visiting our website. Do check other posts and do share with others.