
What is LDAP?
LDAP is lightweight directory access protocol. In general, it’s a database that is organised hierarchically, with data held in leaf nodes of a tree-like structure.
Microsoft Active Directory, IBM Tivoli Server, Oracle Directory, JNDI, and Open LDAP are a few well-known solutions that use LDAP.
Using an LDAP server like Active Directory to authenticate users is known as LDAP authentication.
Consider a software company with more than 50 employees that wants a centralised repository to manage its resources, such as users and PCs. Highly secure computers should only be accessible by specific users. Active directory (LDAP) can be used to accomplish this, allowing only authenticated users to access the secure system.
This series consists of following blogs:
- Install and Configure OpenLDAP Server on Centos Linux machine.
- Install and Configure OpenLDAP Client on Centos Linux machine
STEP 1: Install OpenLDAP server.
# yum -y install openldap-servers openldap-clientsStep 2: Configure LDAP database.
Copy the sample database configuration file for slapd into the /var/lib/ldap directory, and set the correct permissions on the file.
# cp /usr/share/openldap-servers/DB_CONFIG.example /var/lib/ldap/DB_CONFIG
# chown ldap. /var/lib/ldap/DB_CONFIG
# systemctl start slapd
# systemctl enable slapd
Step 3: Configuring LDAP server.
Set openLDAPadmin password. In the below command, a hashed value is created for the given password, take note of it, you will use it in the LDAP configuration file.
# slappasswd
Now, create chrootpw.ldif file, which is used to add an entry to the LDAP directory.
# vi chrootp.ldifAdd the following contents to it.
# specify the password generated above for "olcRootPW" section
dn: olcDatabase={0}config,cn=config
changetype: modify
add: olcRootPW
olcRootPW: {SSHA}xxxxxxxxxxxxxxxxxxxxxxxx
Save and exit the file and add the corresponding LDAP entry by specifying the URI referring to the LDAP server and the file above.
# ldapadd -Y EXTERNAL -H ldapi:/// -f chrootpw.ldif
Now, import some basic LDAP schemas as follows:
# ldapadd -Y EXTERNAL -H ldapi:/// -f /etc/openldap/schema/cosine.ldif
# ldapadd -Y EXTERNAL -H ldapi:/// -f /etc/openldap/schema/nis.ldif
# ldapadd -Y EXTERNAL -H ldapi:/// -f /etc/openldap/schema/inetorgperson.ldif
Next, Set your domain name on LDAP DB. For this first, generate the directory manager’s password.
# slappasswd
Create a file chdomain.ldif add following content to it.
# replace to your own domain name for "dc=***,dc=***" section
# specify the password generated above for "olcRootPW" section
dn: olcDatabase={1}monitor,cn=config
changetype: modify
replace: olcAccess
olcAccess: {0}to * by dn.base="gidNumber=0+uidNumber=0,cn=peercred,cn=external,cn=auth"
  read by dn.base="cn=Manager,dc=cloudscoop,dc=net" read by * none

dn: olcDatabase={2}hdb,cn=config
changetype: modify
replace: olcSuffix
olcSuffix: dc=cloudscoop,dc=net

dn: olcDatabase={2}hdb,cn=config
changetype: modify
replace: olcRootDN
olcRootDN: cn=Manager,dc=cloudscoop,dc=net

dn: olcDatabase={2}hdb,cn=config
changetype: modify
add: olcRootPW
olcRootPW: {SSHA}xxxxxxxxxxxxxxxxxxxxxxxx

dn: olcDatabase={2}hdb,cn=config
changetype: modify
add: olcAccess
olcAccess: {0}to attrs=userPassword,shadowLastChange by
  dn="cn=Manager,dc=cloudscoop,dc=net" write by anonymous auth by self write by * none
olcAccess: {1}to dn.base="" by * read
olcAccess: {2}to * by dn="cn=Manager,dc=cloudscoop,dc=net" write by * read
Then add the above configuration to the LDAP database with the following command.
# ldapmodify -Y EXTERNAL -H ldapi:/// -f chdomain.ldif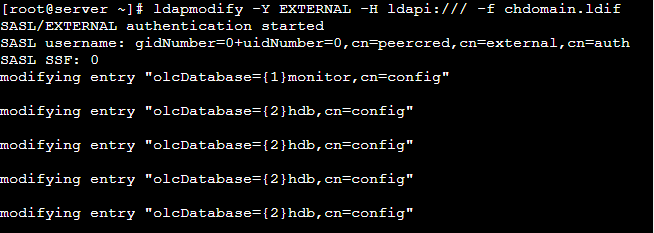
In this step, we need to add some entries to our LDAP directory. Create another file called basedomain.ldif with the following content.
# replace to your own domain name for "dc=***,dc=***" section
dn: dc=cloudscoop,dc=net
objectClass: top
objectClass: dcObject
objectclass: organization
o: cloudscoop net
dc: cloudscoop
dn: cn=Manager,dc=cloudscoop,dc=net
objectClass: organizationalRole
cn: Manager
description: Directory Manager
dn: ou=People,dc=cloudscoop,dc=net
objectClass: organizationalUnit
ou: People
dn: ou=Group,dc=cloudscoop,dc=net
objectClass: organizationalUnit
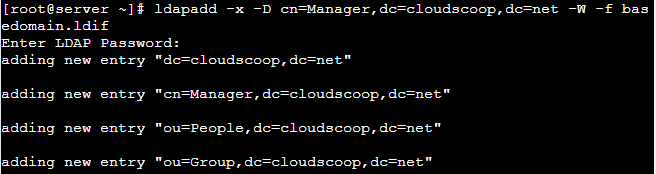
ou: GroupSave the file and then add the entries to the LDAP directory.
# ldapadd -x -D cn=Manager,dc=cloudscoop,dc=net -W -f basedomain.ldifNote: When prompted for password , give diretory manger’s password.
STEP 4: Add user accounts.
Add LDAP User Accounts in the OpenLDAP Server.
First, create an encrypted password and then create file ldapuser.ldif to add users to it.
# slappasswdNote: Copy the encrypted password.
create a file ldapuser.ldif and followin content to it.
# create new user
# replace to your own domain name for "dc=***,dc=***" section
dn: uid=cent,ou=People,dc=cloudscoop,dc=net
objectClass: inetOrgPerson
objectClass: posixAccount
objectClass: shadowAccount
cn: Cent
sn: Linux
userPassword: {SSHA}xxxxxxxxxxxxxxxxx
loginShell: /bin/bash
uidNumber: 1000
gidNumber: 1000
homeDirectory: /home/cent

dn: cn=cent,ou=Group,dc=cloudscoop,dc=net
objectClass: posixGroup
cn: Cent
gidNumber: 1000
memberUid: cent
load the configuration to the LDAP directory.
# ldapadd -x -D cn=Manager,dc=cloudscoop,dc=net -W -f ldapuser.ldif
Now, add users and groups in local passwd/group to LDAP directory.
# vi ldapuser.sh
# extract local users and groups who have 1000-9999 digit UID
# replace "SUFFIX=***" to your own domain name
# this is an example
#!/bin/bash

SUFFIX='dc=cloudscoop,dc=net'
LDIF='ldapuser.ldif'

echo -n > $LDIF
GROUP_IDS=()
grep "x:[1-9][0-9][0-9][0-9]:" /etc/passwd | (while read TARGET_USER
do
    USER_ID="$(echo "$TARGET_USER" | cut -d':' -f1)"

    USER_NAME="$(echo "$TARGET_USER" | cut -d':' -f5 | cut -d' ' -f1,2)"
    [ ! "$USER_NAME" ] && USER_NAME="$USER_ID"

    LDAP_SN="$(echo "$USER_NAME" | cut -d' ' -f2)"
    [ ! "$LDAP_SN" ] && LDAP_SN="$USER_NAME"

    LASTCHANGE_FLAG="$(grep "${USER_ID}:" /etc/shadow | cut -d':' -f3)"
    [ ! "$LASTCHANGE_FLAG" ] && LASTCHANGE_FLAG="0"

    SHADOW_FLAG="$(grep "${USER_ID}:" /etc/shadow | cut -d':' -f9)"
    [ ! "$SHADOW_FLAG" ] && SHADOW_FLAG="0"

    GROUP_ID="$(echo "$TARGET_USER" | cut -d':' -f4)"
    [ ! "$(echo "${GROUP_IDS[@]}" | grep "$GROUP_ID")" ] && GROUP_IDS=("${GROUP_IDS[@]}" "$GROUP_ID")

    echo "dn: uid=$USER_ID,ou=People,$SUFFIX" >> $LDIF
    echo "objectClass: inetOrgPerson" >> $LDIF
    echo "objectClass: posixAccount" >> $LDIF
    echo "objectClass: shadowAccount" >> $LDIF
    echo "sn: $LDAP_SN" >> $LDIF
    echo "givenName: $(echo "$USER_NAME" | awk '{print $1}')" >> $LDIF
    echo "cn: $USER_NAME" >> $LDIF
    echo "displayName: $USER_NAME" >> $LDIF
    echo "uidNumber: $(echo "$TARGET_USER" | cut -d':' -f3)" >> $LDIF
    echo "gidNumber: $(echo "$TARGET_USER" | cut -d':' -f4)" >> $LDIF
    echo "userPassword: {crypt}$(grep "${USER_ID}:" /etc/shadow | cut -d':' -f2)" >> $LDIF
    echo "gecos: $USER_NAME" >> $LDIF
    echo "loginShell: $(echo "$TARGET_USER" | cut -d':' -f7)" >> $LDIF
    echo "homeDirectory: $(echo "$TARGET_USER" | cut -d':' -f6)" >> $LDIF
    echo "shadowExpire: $(passwd -S "$USER_ID" | awk '{print $7}')" >> $LDIF
    echo "shadowFlag: $SHADOW_FLAG" >> $LDIF
    echo "shadowWarning: $(passwd -S "$USER_ID" | awk '{print $6}')" >> $LDIF
    echo "shadowMin: $(passwd -S "$USER_ID" | awk '{print $4}')" >> $LDIF
    echo "shadowMax: $(passwd -S "$USER_ID" | awk '{print $5}')" >> $LDIF
    echo "shadowLastChange: $LASTCHANGE_FLAG" >> $LDIF
    echo >> $LDIF
done

for TARGET_GROUP_ID in "${GROUP_IDS[@]}"
do
    LDAP_CN="$(grep ":${TARGET_GROUP_ID}:" /etc/group | cut -d':' -f1)"

    echo "dn: cn=$LDAP_CN,ou=Group,$SUFFIX" >> $LDIF
    echo "objectClass: posixGroup" >> $LDIF
    echo "cn: $LDAP_CN" >> $LDIF
    echo "gidNumber: $TARGET_GROUP_ID" >> $LDIF

    for MEMBER_UID in $(grep ":${TARGET_GROUP_ID}:" /etc/passwd | cut -d':' -f1,3)
    do
        UID_NUM=$(echo "$MEMBER_UID" | cut -d':' -f2)
        [ $UID_NUM -ge 1000 -a $UID_NUM -le 9999 ] && echo "memberUid: $(echo "$MEMBER_UID" | cut -d':' -f1)" >> $LDIF
    done
    echo >> $LDIF
done
)
Run the script and add entry to LDAP Database as follows:
# sh ldapuser.sh# ldapadd -x -D cn=Manager,dc=cloudscoop,dc=net -W -f ldapuser.ldif
STEP 5: Install phpLDAPadmin for GUI access
# yum --enablerepo=epel -y install phpldapadminNow, edit the configuration file of phpLDAPadmin /etc/phpldapadmin/config.php as follows:
#vi /etc/phpldapadmin/config.php
# line 397: uncomment, line 398: comment out
$servers->setValue('login','attr','dn');
// $servers->setValue('login','attr','uid');
[root@dlp ~]# vi /etc/httpd/conf.d/phpldapadmin.conf
Alias /phpldapadmin /usr/share/phpldapadmin/htdocs
Alias /ldapadmin /usr/share/phpldapadmin/htdocs
<Directory /usr/share/phpldapadmin/htdocs>
  <IfModule mod_authz_core.c>
    # Apache 2.4
    # line 12: add access permission
    Require local
    Require ip 10.0.0.0/24
Now, restart httpd
# systemctl restart httpdAccess to the “http://(server’s hostname or IP address)/ldapadmin/” from a client which is in the network allowed by http server and then Click “login”.
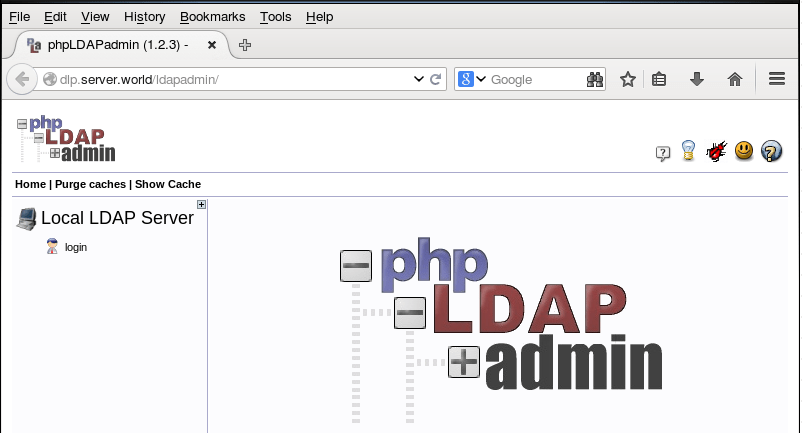
Authenticate with Directory Manager account. On login DN field you will use something like the following:
cn=manager,dc=cloudscoop,dc=net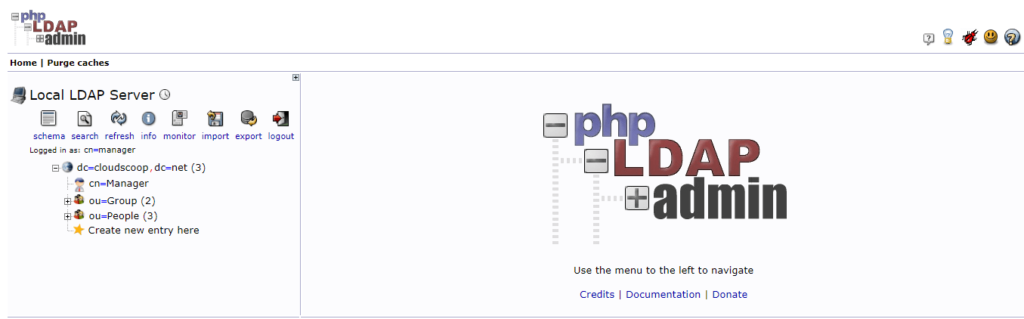
In this web interface, you can add people, organisations, and groups in addition to everything else we’ve done.
PART 2: Install and Configure OpenLDAP Client on Centos machine.